Quick and Easy Breakfasts

Fueling your body with the right nutrients before and after swim practice is crucial for maintaining energy levels, optimizing performance, and aiding in recovery. These breakfast recipes will provided you with a variety of quick and easy breakfasts, satisfying snacks, hydrating and nutrient-rich beverages to meet the specific needs of swimmers.

1.1 Overnight Oats with Fruit and Nuts

Ingredients:

Instructions:

  1. In a mason jar or airtight container, combine the rolled oats, almond milk, Greek yogurt, chia seeds, and honey or maple syrup.

  2. Stir the mixture well to combine, then cover and refrigerate overnight.

  3. In the morning, top the overnight oats with diced fruit and chopped nuts. Enjoy cold or at room temperature.

Nutritional Information (approximate per serving):

Calories: 420, Protein: 18g, Carbohydrates: 52g, Fat: 18g

1.2. Greek Yogurt Parfait with Granola and Berries

Ingredients:

Instructions:

  1. In a bowl or glass, layer half of the Greek yogurt, followed by half of the mixed berries and half of the granola.

  2. Repeat the layering with the remaining yogurt, berries, and granola.

  3. Drizzle honey or maple syrup on top and enjoy immediately.

Nutritional Information (approximate per serving):

Calories: 380, Protein: 20g, Carbohydrates: 55g, Fat: 10g

1.3. Veggie Omelette with Whole-Grain Toast

Ingredients:

  • 2 large eggs

  • 1/4 cup diced bell pepper

  • 1/4 cup diced onion

  • 1/4 cup diced tomato

  • 1/4 cup chopped spinach

  • 1/4 cup shredded cheese (such as cheddar or mozzarella)

  • Salt and pepper, to taste

  • 1 tsp olive oil

  • 2 slices whole-grain bread

Instructions:

  1. In a bowl, whisk together the eggs, salt, and pepper. Set aside.

  2. Heat the olive oil in a non-stick skillet over medium heat. Add the bell pepper and onion, sautéing until softened, about 3-4 minutes.

  3. Add the tomato and spinach to the skillet, cooking for an additional 1-2 minutes.

  4. Pour the whisked eggs over the vegetables, tilting the pan to evenly distribute the mixture. Sprinkle the shredded cheese on top.

  5. Cover the skillet and cook for 2-3 minutes until the eggs are set and the cheese is melted.

  6. While the omelette cooks, toast the whole-grain bread to your desired level of crispness.

  7. Carefully fold the omelette in half, and serve with the toasted whole-grain bread.

Nutritional Information (approximate per serving):

Calories: 470, Protein: 28g, Carbohydrates: 34g, Fat: 25g

1.4. Avocado Toast with Smoked Salmon

Ingredients:

  • 2 slices whole-grain bread

  • 1 ripe avocado

  • 1/2 lemon, juiced

  • Salt and pepper, to taste

  • 4 oz smoked salmon

  • Optional toppings: thinly sliced red onion, capers, chopped fresh dill, or a sprinkle of everything bagel seasoning

Instructions:

  1. Toast the whole-grain bread to your desired level of crispness.

  2. In a small bowl, mash the avocado with the lemon juice, salt, and pepper.

  3. Spread the mashed avocado evenly on the toasted bread slices.

  4. Top each slice with smoked salmon and any additional desired toppings, such as red onion, capers, or fresh dill.

  5. Serve immediately and enjoy!

Nutritional Information (approximate per serving):

Calories: 480, Protein: 25g, Carbohydrates: 40g, Fat: 25g

1.5. Peanut Butter and Banana Smoothie

Ingredients:

Instructions:

  1. In a blender, combine the frozen banana, almond milk, peanut butter, Greek yogurt, honey or maple syrup (if using), and vanilla extract.

  2. Blend until smooth and creamy.

  3. Add the ice cubes and blend again until the smoothie reaches your desired consistency.

  4. Pour into a glass and enjoy immediately.

Nutritional Information (approximate per serving):

Calories: 460, Protein: 20g, Carbohydrates: 50g, Fat: 22g

Cupid's Picks: Show Your Favorite Amphibian Some Love!

It's that time of year again, everyone's favorite Hallmark driven holiday is almost upon us and I, for one, cannot wait to celebrate with an over-priced box of chocolates (box must be heart-shaped otherwise it’s a non-starter), too many cookies, and sweatpants (hint hint husband). Cliche and sugar related treats aside, there are a lot of people who prefer actual gifts on Valentine's Day (although a surprise burger is a prettyyyy great gift if you ask me…), so I wanted to throw some ideas at you guys that are specifically for swimmers, as well as the staples I've used to get to and from the pool pretty much my entire life. Ready? Show! Me! The! Love! (Jerry Maguire, not the best movie, but definitely quotable).

This one is technically made for runners, but isn’t it a little unfair that they should be the only ones to get an adult sized jumpsuit? Yes, yes it is. And I know mom, life isn’t fair, but clothing should at least try to be so we can all feel included in dressing like giant toddlers and thinking it’s socially acceptable. All kidding aside, this A. T. Yeti jump suit is made of super soft fleece and comes complete with a giant hood. Either you’re like me and have a huge head, you like to pile your hair up on top of your head after hopping out of the pool, or you need room for that sweet mohawk, so that big hood is coming in handy for pretty much anyone. My vote would be to put this on and wear it forever, but it might make more sense to throw on after a pool workout so you don’t freeze on the way to your car. Or simply trade in all of your other clothes and buy this in every color imaginable, because at this point in adulthood this seems like a pretty good uniform, no?

I know I know, everyone who’s a swimmer has 675489302 water bottles lying around their room and stashed all over their house. But the problem with the water bottles we all get at meets and races and collect over the years? They’re cheap plastic, small, and were FREE. Which, if your’e anything like 12 year old me, means you don’t care about them and leave them behind pretty much everywhere you go. Which brings me to my next pick, this beautiful Camelback Chute Mag 32 oz. Water Bottle. It’s an entire liter, has a huge spout - great for getting a good amount of water when you have very little time on the wall between intervals at practice - and is pretty to boot! Best part? You’ve bought it (or received it as a gift), meaning you’ll be much less likely to just leave it behind when you’re heading into the lockerroom to shower after your workout.

As a younger swimmer, my sense of “getting ready after practice” consisted of throwing my dripping wet hair up into some semblance of a bun and having shoes on my feet, so I would never have thought twice about actually using something like this. But now that I’m a fully formed adult (or so I’m told) I finally see the point and great qualities of this product. SwimSpray is a Vitamin C based product that you use when you shower to eliminate chlorine odor and the dryness it can cause to your skin. Sure, this product adds an additional step to your shower routine, but not everyone likes to smell like chlorine all day when they’re sitting at work, or when they get even a little bit hot in their natural habitat - and what I mean by that is I used to sweat chlorine and everyone around me would think it was just bleach seeping out of my pores…think you don’t have this wonderful quality? Well color me jealous. Anywho, this one’s great for those of us with sensitive skin and hair susceptible to damage!

SwimBox Swim Lessons SwimBox Thoughts


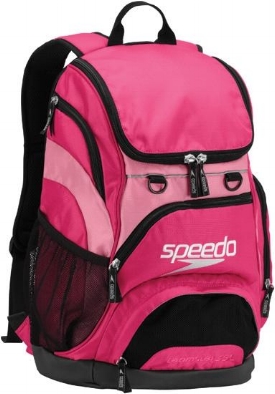
One thing I always coveted were the backpacks all of my older swimmer friends had when I was little. They have side pockets for caps, goggles, and shampoo, as well as a mesh compartment to put your wet suit in after getting out of the water. There's enough space in the main compartment for shoes and the clothes you want to wear afterwards as well as a towel and any hair dryer/straightener you might need. 

The one I use to this day is the Speedo Large Teamster Backpack. It's also great as a carry-on bag for short trips that fits easily in the overhead compartment of airplanes.

SwimBox Swim Lessons Fairfax SwimBox Thoughts


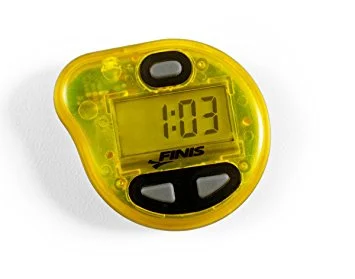
This one might seem a bit odd, but I promise you'll be finding uses for it for years to come. I've had mine since I was a freshman in high school and I've never had any issues with it. What I'm talking about is the Finis Tempo Trainer. This tiny little tool sits inside your cap and gives you something to pace yourself off of. Think of it as a cute little metronome (any orchestra buffs out there? Fun fact: I played the violin for 9 years and my metronome became one of my closest friends when I first started). If you don't know what a metronome is it's something that helps you keep a beat. You can set it to whatever interval you like and it will make an audible beep for you to follow along to. The Tempo Trainer is a great tool to help you work on your pace, rotation, kick, timing of your breath, etc. It's a bit pricey for what it does but it's a great product that lasts for years. And no, sadly, it doesn't come in pink.

Back to the pink theme! My next pick is something I actually stole from my diver friends when I was swimming for my summer team as a kid. The Speedo Sports Towel is 12.5 by 16.5 inches and is the most absorbent thing I've ever come across. It's incredibly light and dries quickly as well. This towel is perfect to have at meets, open water events, and triathlons that won't take up too much room in your bag but will get you drier than any beach towel ever could.

SwimBox Swim Lessons Fairfax Vienna
SwimBox Swimming Swim Lessons

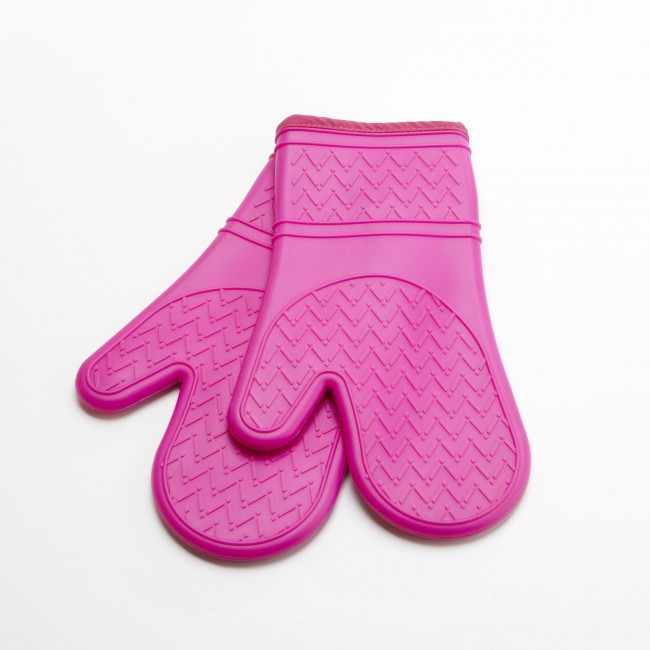
Now before you say it I already know what you're thinking, why in the world is a silicone oven mitt listed in a swimmers gift guide? The answer is that this thing saved my life growing up when it came to getting ready for school after swimming every morning. This one's pretty specific and I'm sure isn't for everyone, but a Silicone Oven Mitt was the one thing that kept my hair straightener from burning a hole straight through my bag. I know, like I said, this isn't for everyone. But it was my mom's idea when I was in high school and I still use it to this day. It's also perfect for hair driers!

SwimBox Swim Team Swim Lessons NCAP Clark Potomac Marlins

Last on the list is simple but something every swimmer should have at least one of, if not 2-3. The Speedo Goggle Case is exactly what it says it is, a goggle case. I had a lot of different variations of this one over the years but this is the best one I've found. It's cheap and easy to use and won't take up too much space in your bag. I used to think these were just silly and unnecessary, but now that I'm an adult and buy my own goggles I use this every time I swim because it keeps them from getting all of those teensy, tiny, scratches all over the lenses, which means it keeps me from buying goggles every 3 weeks because I can't see out of them anymore. Think you don't need this because you're a triathlete and don't swim as much as you bike and run? Think again, because this case will save your goggles from getting damaged in your bag where they're hanging out with all of your other belongings and keep them pristine for race day.

Trying to Find a Pool to Practice In? We've Got 'Em!

If you’re anything like me (and we’ve decided at least two of you are) then searching for new lane reservation protocols and finding out which pools are currently open is about as fun as a hole in your boot in a torrential downpour. As exhausting as calling around and going from website to website can be, we’ve put together a list of all* open pools in our surrounding areas so you don’t have to dig any further on your own!

Mostly every open pool currently requires a reservation/advanced booking, so make sure to check out their websites for more detailed information. The name of each pool listed below links you to that pool’s website, so just click on a pool name to get to their website for more info on reservations and lane rentals!

*I’m sure there are some open pools that aren’t on this list, so if you have some info we don’t please email us at britany@theswimbox.com to let us know so we can add them to our list!

Alexandria :

  • Chinquapin Rec Center - Reservations/tickets only; can be booked via phone or online portal; 45 minute time slots

Arlington:

  • Yorktown High School - reservations only; 45-60 minute time frames; make reservations via their online portal

DC:

Fairfax:

  • George Mason - competition pool closed for Fall 2020; Recreational pool open for 60 minute time slots with reservations.

Leesburg:

  • Ida Lee- first come first serve pool; no appointment necessary

Manassas:

  • The Freedom Center - membership or admissions account required; reservations required 24 hours prior; 60 minute time slots

South Riding:

Springfield: 

  • The St.James - membership required; reservation only via online portal or the St. James App

Sterling :

Not Many Races = Technique Time!

Getting email after email about your races continuing to be cancelled as of late can be disheartening to even the toughest of us. All that hard work, time, effort, and sacrifice, and then there’s no test? No way to see if your results are paying off? Sort of makes you think, “I might as well just stop working on getting better until next year…” right? I honestly can’t blame you for thinking that, but I’m here to tell you that you’re wrong. I’m sorry (actually I’m not, eep), but you just are.

Why am I saying you shouldn’t just wallow in self pity and cookies until your races are all back on the calendar? Because wouldn’t you be just a teeeeeensy bit annoyed with yourself if you didn’t take advantage of your current situation? If you’re anything like me you definitely would be peeved, even if it’s only a little bit. SO I’m here to tell you to not give up and give in to training to be a couch potato, but instead to go even deeper in your training and really focus on the details and minutiae that you don’t normally have enough time to fix.

This time off from racing every other weekend is a gift! (Not the most popular opinion, I know, but stick with me). You can finally take the time to break down your freestyle kick and figure out how to make it more efficient so you have more energy when you jump on the bike. You have time to do all those run drills you’ve been putting off because you’d rather just get your miles in. Training equipment can actually be used properly for injury prevention and strength training in the pool, not just sit at the bottom of your bag unused. Don’t get me wrong, these are things that should always be done. But making concrete and effective changes takes TIME, which you don’t normally have when you’re jet setting off to Cozumel one weekend and Lake Placid the next, now do you?

So it’s not much, but it’s time to step off my little soapbox and let you get back to it. If you choose to dive head fist into your couch and become one with the cushions, go right on ahead. But if you take even one step towards working on those things you just keep putting off? I think you’ll be that much happier. Unless you’re a dog, then definitely stick with option 1 for maximum happiness and couch naps.

Getting Your Shoulders In Switzerland Style

Never Give Up, Never Surrender.jpeg

Raise your hand if you know the body part most prone to injury when it comes to swimmers slash the overall sport of swimming. What was that? Your skin? Nice try but no, get some lotion and your skin will be just fine (unless you have an allergy, then don’t listen to a word I’ve written and consult your doctor). Let’s try one more time…Yes, it’s YOUR SHOULDERS. I knew you’d get it.

So, if that’s the most commonly injured part of your body when you swim consistently what should you do, suck it up? Stop swimming? In the famously genius words of Jason Nesmith (aka Tim Taylor and by that I really mean Tim Allen, just wanted to throw Home Improvement some love), “Never give up, never surrender.” If you’re sitting there scratching your head wondering what that’s from please close this and watch Galaxy Quest immediately. If you don’t like Tim Allen, it’s at least always fun to see Sigourney Weaver hanging out in space again. BUT what I really mean to say is that stopping swimming is not the answer, and sucking it up really isn’t the smartest option here. So what’s there left to do? Now that I’ve gotten enough sarcastic humor in for the time being why don’t we get into that.

SwimBox Sterling Swim Lessons SwimBox Ashburn Swimming Lessons SwimBox Swim Coach Herndon SwimBox Loudoun County Swimming SwimBox Private Lessons Reston Triathlon Coach SwimBox Vienna

In order to protect your shoulders from injury the first thing we need to do is make sure you know the correct position your shoulders need to be in for all things swimming. And to do that we want to share this easy little reset-to-neutral movement you can do every time before you hop into the pool.

SwimBox Swim Coach Sterling Swim Lessons Loudoun County Swimming Lessons SwimBox Ashburn Swim Coach Reston SwimBox Arlington Swim Training Swimming Pool Falls Church

Neutral Shoulder Position is where your shoulder is going to be in the safest position in relation to your body that also allows for full range of motion and sets you up for proper and safe swimming movements (boy, that was a mouthful). In order to find your neutral position you’re going to take your left hand (or right hand, whichever hand you like more and want to start with first) and place it on your right shoulder. Then take your right hand and place it on your right thigh. THIS IS NEUTRAL. The position your shoulder is in after making these two movements is where you want your shoulder to be to stay as safe as possible.

Now that’s great and all, but how do you know when you’re OUT of neutral? I’m so glad you asked! It’s actually even easier than finding neutral position. All you have to do is start to slowly move your right hand towards the back of your thigh - towards your back, towards your butt, however you want to think of it - all the while keeping your left hand on your right shoulder. As soon as you feel your shoulder press forward into your left hand you’re out of neutral position. And whyyy (besides injury prevention) is it necessary to make sure your shoulder is in a neutral position for swimming? Take a look at the pictures below to see the differences in range of motion between your shoulder being out of neutral and your shoulder being in neutral.

Range of Motion NOT IN NEUTRAL

Range of Motion NOT IN NEUTRAL

Range of Motion IN NEUTRAL

Range of Motion IN NEUTRAL

As you can see in the picture on the right, where the shoulder is IN NEUTRAL, you have a much larger range of motion to make proper and safe movements in the water. Whereas when your shoulder is OUT OF NEUTRAL, as shown on the left, you are much more restricted in your movements are are extremely limited in your range of motion. Not to mention the more out of neutral your shoulder becomes if you swim this way, the more strain and pressure will be applied to your shoulder joint, which will lead to varying degrees of injury.

Proper range of motion when your shoulder is in neutral allows for a proper and safe recovery, additional feedback as to where your hand needs to be during your finish (to stay in neutral), and better movement as a whole during your entire stroke.

Don’t miss our video that shows this movement in action!

Breathe In And...Nope, That's The Whole Workout

While we’re all running out of things to eat, watch, and do at the moment, it got me thinking: what’s something we can all work on right now? Something that doesn’t require the aid of any equipment, isn’t a squat with 4 different variations on moves and thingamabobs, and is also stress relieving? BREATHING! I know, I know, you all already know how to breathe, I’m quite impressed. But what about controlling your diaphragm? And focusing on core stability? Nothing? Okay, let’s get started then.

Your diaphragm is the muscle that sits right below your lungs and is attached to your lower ribs (take a look at the diagram to the right to better see this muscle’s placement). Your diaphragm doesn’t just help you breathe, but it also helps you with proper core stability in and out of the water. The reason for exercising this muscle is exactly the same as the reasoning behind exercising any muscle: to get stronger. A weak diaphragm = weak core stability, which can lead to improper posture, sinking hips/legs, inability to balance properly, and poor streamline while you’re swimming.

SwimBox+Arlington+Swim+Coach+SwimBox+Swim+Training+SwimBox+Swim+Lessons+Fairfax+SwimBox+Sterling+Swim+Coach+SwimBox+Herndon+Swim+Lessons
SwimBox Arlington Swim Coach SwimBox Swim Training SwimBox Swim Lessons Fairfax SwimBox Sterling Swim Coach SwimBox Herndon Swim Lessons

To work on strengthening your diaphragm you’ll need to grab your trusty sandbag. You know, the thing we all have lying around our homes because we use it so often…Wait, you don’t have a sandbag? I’m shocked (…not). In this case simply use a backpack and fill it up with about 10-15 pounds worth of stuff - start lighter! - and you’re all set. This is what we’re going to use as the weight for this exercise.

Once you have your weight, you’re going to lie down - on a firm/flat surface - flat on your back. Take your weight and place it on your lower ribs. Next you want to inhale and exhale as you normally would, but making sure your lower back and your stomach are filling with air. You know that feeling you get after 3 too many slices of pizza, where your lower belly feels like a balloon? That’s what we’re looking for here. Take these inhales and exhales slow so you can pay attention to the weight moving up and down with your breath. REMEMBER, you’re not trying to push your stomach out, merely to feel your diaphragm filling and deflating with each inhale and exhale.

Take a look at our Sandbag The Diaphragm video to see this exercise in action and make sure you have the weight placement correct. Have fun breathing!

Keeping Your Head in The Game...er, Water...

The perfect freestyle breath is somewhat of a mythical creature in the swimming world. Does it exist? Have you ever seen one? Or better yet, accomplished one yourself? Although it might seem an impossible feat to have a freestyle breath so perfect it rivals that of the genius owned by the inventor of pizza from way back in the day, it can definitely be achieved. AND it’s something you can work on in the comfort of your own home! Alone! 6 feet away from someone else! I mean, you can work on it anywhere and at any time. Any takers?

SwimBox Swim Coach Arlington Swim Lessons Fairfax  SwimBox Ballston Swimming Coach DC SwimBox Cherrydale Swim Instructor Falls Church

To put it simply, all you have to be able to do in order to have the perfect freestyle breath is sniff your armpit. Or have the ability to check out that hot guy/girl/donut sitting behind you. Easy, right? And by that I mean, what in the world am I talking about (and where is that donut…)? But alas, I’m getting ahead of myself. When you go to take a breath, the first thing to keep in mind is that you want to keep your head down. DO NOT LIFT YOUR HEAD. Sorry to yell, but that one’s pretty key here. Turning your head, as opposed to lifting your head, allows you to get your air while still maintaining your straight spine, shoulder/hip alignment, and streamline position. Lifting your head causes your legs and hips to sink, breaks your straight spine, puts your shoulders/hips out of alignment, and prevents you from having a proper streamline. Simplest thing to keep in mind is that you want to TURN your head to breathe, not LIFT your head to breathe. Once you’ve committed to turning your head, we can move onto the next step.

SwimBox Swim Coach Arlington Swim Lessons Fairfax  SwimBox Ballston Swimming Coach DC SwimBox Cherrydale Swim Instructor Falls Church

Now, let’s break down my analogy about smelling your pits and scoping out the babes. Your head follows where your eyes look, so you want to make sure you’re looking in the right direction to help keep your head down and not lift it up. My favorite cue to give, when we have a client in for a lesson at SwimBox, is to turn your head to the side WHILE looking back towards your armpit/the back corner of our pool. My husband’s favorite cue is to “check out that hot guy behind you.” One of his clients coined this phrase when he was explaining the movement to her for the first time. Gotta love how our brains work to help us understand things, huh. Anyhoot, the point of both of these cues is to keep your eyes looking down while you swim, then when you turn your head to breathe to look back and in the same direction as your arm about to exit the water.

SwimBox Swim Coach Arlington Swim Lessons Fairfax  SwimBox Ballston Swimming Coach DC SwimBox Cherrydale Swim Instructor Falls Church

How can you work on this in between watching Grey’s Anatomy on Netflix for the 657483 time and picking out just the right sweatpants you want to wear tomorrow? Two things. First, work on simply turning your head to each side without any added movement. You can do this any time you’re sitting upright and have space to move (ie, not while you’re lying down). I want you to make this movement to understand the difference between lifting your head up when your’e in the water and simply turning it to the side. Second, put one arm up like you’re swimming and have one arm out in front of you (if you’re sitting simply put one arm straight up into the air like you’re reaching towards a cloud), and work on trying to turn your head while looking back towards your armpit. This is the movement you want to make in the water. Now I know this isn’t perfect, but it’s definitely a start to understanding the how to obtain the perfect freestyle breath.

Don’t forget to see it in action! Watch our Freestyle Breath Video to see the end goal of what you’re working towards!